A quick plug for some sellers on eBay that have great DIY analog gear, I‘ve bought from most of them at some point in the past and will vouch:
****Blue_lantern91754 - lots of self-built analog filters that mimic old and rare classics such as oberheim and the Russian polivoks (which I would kill to get my hands on one stateside instead of getting raped for shipping from Russia in some shady deal). Also makes (dunno about lately) SID64 chip based synths that rival the thousand dollar elektrons.
****Health club music - forget what their eBay name is, but just search for it. Great simple portable analog synths with simple, colorful interfaces custom made each time.
****Bluelightintheattic - also can be found on folktek.com or Ariusblaze.com - very cool original works of noise synths, beautiful craftsmanship, very unique.
****atomolabs - interesting and well-crafted analog synth/sequencer combos. I think he has a blog somewhere too.
****Vwfastmatt - if you don’t want to circuit bend your own speak and spell/read/math, this guy sells good quality ones for relatively cheap, and will even throw on the highly_liquid MIDI addition for a small fee (don’t think it was matt’s work but I’ve always had issues getting my MIDI port to work, just FYI)
Sunday, July 26, 2009
Saturday, July 25, 2009
Back to the x0xbox
More time between posts, but my wife has been gearing up her own blog for art sales and I came back around to mine, too.
Gonna try and hook up an oscilloscope that came with an electronics hobby kit my son got. that should help me get the x0x going straight, as i built the entire thing and even tried it out - but then left it on the shelf because the tuning was so poor and i could not just get it to "happen" just right by randomly twisting the internal pots.
So once i get that, i'll report some results. would really love to finally have some of that acid bass sound going in a couple glitchy tracks i've been working on recently.
fly on over to www.equulei.com for some links to recent tracks we have up on soundcloud, as well as that full dj mix on Colossus - its still up, too.
Sunday, May 17, 2009
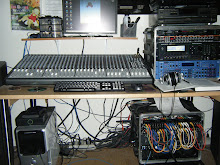
Studio Move
I haven't posted in awhile, and for good reason. after i completed the Colossus project i played out once or twice and then proceeded to break down the entire studio and work on moving it to the basement. First we had to partially finish a room in the basement, which entailed a couple pieces of drywall and some cheap carpet.
then run some power to it (thanks to my neighbor, a great guy!). then everything that was packed up got moved down and reinstalled - very slowly. i had to redo a lot of the wiring, i am still short by several snakes and other miscellaneous. i took the opportunity however to also upgrade the sound card to a lexicon FW810, and consolidate the synths into a giant data center rack (thanks to buddy who had it sitting idle in his garage). also got an A-frame rack from him and a double tier to get the synths out in the open where they can actually be used. finally, kevin was touring with chicago afrobeat project, and had a stop in denver, so he brought the polysix.
so, combined with some of my sister's gear (a full 88 key triton, tech 12's and pioneer mixer setup), the result is a much better studio, far more space, and quicker access to almost all of the gear.
Also invested in a NAS media server to do major backup of all my files. Buffalo Terastation 2TB is what i went with. pretty sweet little device.
now its time to start working the tunes again. i just hooked up with an old friend who can lay down some guitars for me, my sister is gonna get on the vocals, etc. i also need to get some new firmware for Colossus that hale micro sent me, and still want to do some upgrades to the Colossus wiring.
pics of the new studio below.
the data center rack:

new live/dj area with Colossus in the back:

a frame rack w/ synths:

and new effects station (with daughter's backside rushing to get out of the picture):

Only known casualty of the move, and it was having issues long before, is one of my tannoy monitors. trying to decide what to do about that in the coming days/weeks....
Sunday, April 5, 2009
Successful Runs
I have been testing the Colossus for about a week now, and it is holding up fine. first started with building a humungous Ableton template (cubase is next), and then used it to get a couple diverse sets going (see below to listen to or DL one of them).
The one challenge with the templates and using MIDI learn is that i still have a lot of residual signals coming in from various pots. since they are all brand new i don't think its cleaning, its probably just weak wire, the wiring job i did, absence of capacitors between grnd/5v, or other factors. it isn't horrible, and i can usually isolate and turn that pot all the way down to reset and then it stops.
A couple more pics of Colossus in the environment:

I am completely out of room in my studio. I had to kick the DX7 out completely, and much of my DJ rig is no longer set up. Somehow, i want to get this thing closer to my main production area here:

As you can see though, not sure how thats gonna happen...
One of the boards continues to give me fits, but it has not failed completely like the other did. This fortunately can be remedied by power cycling the entire enclosure after the computer is switched off. not sure what that all means, but its the same control surface as before, and i still suspect the lousy sliders. intending to disconnect them, as a result.
Next week my attention will turn to trying to get the x0xb0x tuned and then closed up so i can actually start using it in the studio. its time to get back to the tunage, and i have nearly a dozen new ideas just waiting to be sequenced out - and now i have a massive controller to assist. ;)
If Budros' HTML skills work, below is the embedded file you can listen to - its the first test run of Colossus for a complete set. This particular set is just a conglomeration of both new and old equulei IDM/breaks type tracks - its a full 95 minutes so you may wish to download instead. For those not familiar with Equulei, that's the end result of all this gear junkie-ism - writing tracks for that effort. click the equulei link to the right side for more.
http://media.soundcloud.com/equulei/equulei-colossal-beats/download
Tuesday, March 31, 2009
Field Trials Begin
Over the last 48 hours we finished the final coats of stain and acrylic covering, and i finished the last of the wiring of panels 5 and 6.
We then began harnessing the UMC's to the shelf inside the enclosure, as seen below:

Next came drilling holes for the screws on the face panels. we set the panels in one by one and marked them, took them off and drilled, reset the panels and put all the screws in. way too many, frankly. here is what it looks like underneath now, as we have not yet re-attached the doors:

Finally, we attached the heads to the UMCs (i labeled each head by X-Y, x=UMC channel, Y=which of the four heads it goes on, for a total of 25).
We brought it upstairs to the studio - there is really no room whatsoever left, but i shofted some things around to get it in here. As of now, i am happy to report it is pwoered, connected to the computer, and all controls are working perfectly. will start creating an ableton set to complement it immediately and give it a good thorough exercise over the next week.
here it is in all its glory:

Side view:

We still need to:
* buff it and shine it one last time
* re-attach the doors
* drill a hole or figure out a scheme for the cables coming from the USB hub
* attach the main volume knob somehow
* optionally re-add the small green LED by the channel volume knobs
* find and attach slider knobs (8mm head)
and maybe some other things i can't think of now, but overall this thing is SIIIIIICK!!!
thank you to Dismal/Steve for the Colossus name, Ken at Hale Micro for helping out and answering so many questions, my great wife Jeannette for helping and supporting at every stage, Jnet's dad Howard for the carpentry experience and precision that i never would have come close to, and even to Ethan for setting me on this course (whether you realized it or not). This whole thing started from me wanting to take apart a computer keyboard and wire the letter buttons to other controls that could be used to control Ableton. his first comment was, thats way harder than it sounds, you should try something else. wallah, here is the something else.
Gonna break to play with this thing for a few days, but soon enough i will get started on a set of other controllers in a similar vein (but considerably smaller) to sell and/or give to the equulei compatriots.
If anyone wants more detail on part numbers, etc, feel free to drop me a line any time.
Saturday, March 28, 2009
Gear Porn!!
okay, one more picture just for the drooling aspect. put most panels on even though we aren't ready to actually attach, just to see what it looked like:

good night all. busy day tomorrow working this thing.

good night all. busy day tomorrow working this thing.
Finishing Touches
A couple structural things remained, which were completed this past week.
the doors on the back to gain access to the UMCs, underside of the panels for replacement, wiring, USB hub, etc:

and then some handholds to carry the beast. extra wood placed inside because the outer wall is really just a thin layer of oak ply, and then braced it against the frame itself. they should be pretty sturdy:

above you can also see inside and below the handholds is a small shelf that was put in to accomodate the UMCs. we will bolt them onto that shelf with 4-40 screws and a small standoff which have already been purchased, just waiting for final touches to be finished.
Finally, we finished sanding and beveling edges, and then began staining it. pictured below is after the first coat, we will do at least oen more, and then acrylic goes on that to make it smooth and shiny:

note in the pic above the enclosure is lying on its back.
on the technical front, i have encountered a critical problem and have reached out to Ken @ hale micro to see whats up. last night i tested panel 3 - its the main one with joystick, faders, and main volume knob. i tested it fine on all fronts and even played with ableton briefly. this AM i was showing jnet's dad how it worked, powered it up, and after initially turning on fine when the computer cranked on - it blinked out. since then it has not come on when the computer is attached, but strangely when i plug it just to the USB hub, it powers on fine. no idea whats going on and until i have some advice from ken, not wanting to try plugging it all into one of the extra couple UMCs i have for fear of another one getting fried, if thats what even happened. maybe i am just trippin on some stupid setting, but all the other ones seem to be working great now.
UPDATE: adding schematic below for Ken to check out

Wednesday, March 25, 2009
Panels and Enclosure completed
I have finished wiring and testing out two panels now - in the pic below you may be able to see the bottom row of green/red buttons lit up - they llok great. you can also see the clear difference between the first one i fucked up (on left) and the one i wired correctly (on right):

i am running both through a USB hub that will be velcroed into the bottom of the enclosure to grab data from all 6 devices in the end. its not visible in the pic above.
and i also solved the button issue mentioned below. I had a dip switch setting wrong that was interpreting two buttons as if they were analog pots. done deal. the LED issue remains, but on the second one that i wired up correctly and without the LEDs, everything is running perfectly. i may detach them from the first and just attach to power. they will be always on. interesting but not what i had hoped for.
In addition, the entire enclosure is done save for staining it, which i think we will do this weekend. and i have connected all buttons and pots, ready to be wired as soon as i can:

Sunday, March 22, 2009
Panel Work
I have finally completed all of the first panel, which is equivalent to one full UMC32 circuit board. Here it is below:

You will notice i failed to put two of the small knobs on - this is due to discovery of an issue that i did not realize until near the end, and at the moment i am not willing to back out and redo a bunch of soldering - i just really want to move on to the next panel and fix the mistake there. the issue arose despite my best planning for which controls would go on which of the four heads of the UMC. the last one was gooing to have 6 analog pots and 2 digital buttons.... unfortunately the UMC DIP switch settings for the last head only allow for 0, 2, 4, or 8 analogs... so i did not even wire up the last two pots. thus the lack of knob, which will be an obvious sign to me when playing it that nothing is attached to those controls. i'll fix it later. for the next identical panel i am spreading the analogs out more.
Other issue is a soldered and wired up the volume knobs to the LEDs before realizing my original design, and much more sense from a space perspective, is that they should be swapped with the pan knobs, smaller all black with vertical white line seen at the bottom of the panel. the other panels will correct for this as well.
And i am still having the LED issue - the two volume knobs are acting like log pots and giving me fits when trying to fine adjust volume of a track.... such is life. if the next one does it too, i may just unlink the LEDs from the volume and give them power. it was a good thought, although i admit to stealing it from a youtube video DIY project.
Another thing i discovered - although i intentionally waited to attach the knobs until each pot was confirmed good (because they won't come back off without serious risk to the panel), it has a price. the leverage needed to squeeze them onto the shaft is gone with the crazy wire mess in the back, trying not to touch wires and solder joints, etc. the result is some knobs i can't get all the way on, so they have slight variations in elevation from the base of the panel. not sure if its obvious in these pics.
Only other issue i have seen thus far is a couple of the illuminated buttons are acting strange in ableton - not sure if it is maybe a setting i have in ableton rather than the buttons... problem is they are assignable, ableton recognizes them, but when i assign them to things like mute or stop, they only operate once (mute track, but will not unmute, or vice versa). after i click manually with mouse, they will perform the operation once, and not again. not sure what that means.
Overall though pretty good success - all controls responding and i assigned the entire thing to a new set in ableton just to test it all out. hopefully some of the bugs go with it soon.
Here is a profile pic just to give an idea of the crazy mess of wires on the underside. it would probably look better were i more professional about it:

Starting on the next panel ASAP, and after getting the hang of it and discovering a few tricks, its moving faster. No pics but jnet's dad is done with the rear doors, the corner trim, and the shelf for the UMC's to attach to.
Friday, March 20, 2009
Box Almost Done
We spent the majority of today finishing assembly on the box and beginning to size for the plexiglass panels. There are lots of notes on this, but here is how it looks right now, from the side and including the trim we are putting around all the corners, ala oak cabinets style:

And a brief view from the back side:

Finally got a view of the plexiglass panels, and they rock. initially they are covered with some protective film, so you will see in many pics i've left it on except a couple to start attaching all the controls. They do the laser cuts with the film still on. Here are the panels that will eventually go on the device:

In these views, I have attached all the potentiometers, but no knobs are attached yet. I want to plug in and test each before i attach them, because in many cases they are next to impossible to remove once shoved over the shafts.
Here we set up all 6 panels after getting the trim around the perimeter of them that is set to be flush with the panels:

And finally, after taking it home and spending over two hours (much longer than i thought), i have one head of one UMC plugged in and running successfully (so, only 23 more to go), including the LED signal from volume knob:

The LED attachment works but is causing weird issues.... i wonder if i have the wrong resistor, but the knobs they attach to are acting almost more like log pots than linear. will investigate further.
Time permitting, we will finish the trim, the shelf across the bottom to attach the UMC's to, and even the doors in the back. then its all soldering until dawn.
BOOOOOOM!!!
Wednesday, March 18, 2009
The Face Panels
Face panels were completed, paid for, and received yesterday. J-net's dad bumped them up against the frame as pictured below and they appear to fit perfectly, so we are a go for trying to finish it this weekend!!!! many pics hopefully to follow.
Sunday, March 15, 2009
The Frame
After a brief visit over to the in-laws house, here is how the frame is shaping up to be:

I have to admit this is substantially cooler and better quality than i ever could have done on my own. with luck, the panels are done in the next few days and we can do final assembly of the box next weekend. then comes the fun part of soldering 190 control points plus LED power, etc.
This thing is getting close!
Saturday, March 14, 2009
Some Pics to Bide Time
Here are a few shots from the Visio drafts of version 4 of Colossus - and i did finally get the call from the plastics place. they quoted me and began work on the panels - likely to be done mid-week.
here is the main panel appearance:

And actual cut positions for the laser:

And a view of the connection scheme to the UMC devices (each color on each panel represents one of four heads per board, and i've tried to combine the analog and digitals together as much as possible since the DIP switches must be set accordingly):

And finally a picture of the frame that jeannette's daad began building:

I believe each is a support, so spaced across three feet, each on holds the edge of one panel below and one panel above, for a total of 6 panels at 12x18". more pics after some work or viewing of it this weekend.
Thursday, March 12, 2009
Getting REEAAAALLLY Close
i finished the basics of the x0xb0x last night and bolted it (sort of) to the case and turned it on. the system works, and most functionality appears fine. i haven't had a chance to test it with MIDI, computer/USB control, etc, but so far so good. i was able to make patterns and it sounded just like a tb303. AWESOME.
some miscellaneous troubles, however, that i will need to work out. the standoffs, screws, and faceplate do not seem to interact well together, evne after following the instructions to a tee. this means that some of the buttons are a little too sunken in, but i am able to trigger them all.
additionally, i can tell the tuning is not correct, which could be a result of not having an oscilloscope to test with when i was building. before i bolt the thing together finally i will get under the circuit board and adjust the trim pots to see if that helps. i also can tell that a couple of the other pots (cutoff and decay, for example) really don't have much effect at all until at least half way through the turn, almost as if they are supposed to be log pots rather than linear, or vice versa.... not sure but i will see if that issue exists in the ladyada tech forums.
finally, i cannot find the screws, if they ever existed, to bolt the plastic case together from the bottom. very annoying, but i can probably find some elsewhere if i have to.
overall very excited though that such a complex project, for being my first foray, actually even turned on, didn't explode, makes noise, and responds to stuff that i do. acid basslines here i come.
For colossus, NEWSFLASH - the plasticare guys are STILL not finished... they have promised (as well as a few times previously) to have the final quote and readiness to start by um... yesterday. i am crossing fingers and praying that they might pull a miracle and have it by this weekend, because:
the frame and wooden enclosure is almost complete! jeannette's dad is building almost the whole thing and says he is ready for the plastic panels... i will go check it out this weekend and take pics, but this is a huuuuge help, as i know NOTHING about woodwork. we drew up a design on a piece of paper last week, and before you knew it, he was half done. retirement has its benefits. ;)
Wednesday, March 4, 2009
x0x and Colossus Progress Report
Been awhile since i posted, so a coupel quick updates. the x0x is coming along nicely, though i keep forgetting to swipe my wife's camera to take some pics of the circuit board and what not. i have finished all the internal components (VCO, VCA, envelope, I/O section, etc) except the sequencer - and planning to tackle that this weekend. all the tests i ran to see if i was doing it right seem to indicate all sections have adequate power, etc. the one thing i didn't have was an oscilloscope, and decided to wing it without it after seeing how much an oscilloscope costed. if i decide to embark on more analog synth projects, i will go and get one.
As for the Colossus, i am STILL waiting on the plastics place to finish my design, though i think its pretty close. i still think they are kind of idiots for taking so long (and they seem to have real issues with working via email - welcome to the 19th century douchebags).... but i settled on a design that was cheap and easy for them. it amounts to 6 panels each 12"x18" and only an 1/8" thick, negating the need for countersinks. there will be a single brace behind each one across the middle, and i think that will be plenty. each panel has approximately 32 control points, so they equate to one UMC each. the case is not going to be all clear, the panels are now black, and the overall case is wood - and i have been toying with different options for making it somewhat "modular" - so if i didn't want to take the whoel gargantuan thing to a show, i could just grab one or two panels or whatever, and wire them to the USB hub.
I'll try and post some drawings of that later. kudos go to my wife and to her dad for being very eager to help build that wood case, as i am stupid about that stuff. we worked on a little prototype a couple weeks ago and i am actually going to keep it and wire another single UMC to it when i get the time between the other larger projects above.
Thursday, February 19, 2009
x0x Progress Step One
While putting Colossus aside temporarily while i wait for the panels, i started the x0x project, and am happy to report that the first section of building out the boards, the power section which converts from AC to DC power, was a success. i actually didn't think it would be given how beginner level i am and how tiny and specific a lot of the solder points and test junctures were. but it did work. tonight i start work on the VCO section.
baby steps.
and absolutely nothing of import to note on the panel work. the plasticare guys are fucking idiots, even after giving them the completely new and simple design - i regret getting involved with them. however, light at the end of the tunnel, the woodworking place sent me a message back saying they could do the cuts for pretty cheap, although they may have limited plexiglass materials from which to choose.
Saturday, February 14, 2009
Ep.4: A New Hope
a new idea has emerged to solve for the Colossus woes, make things cheaper, and negate the need for complicated countersinks.
the new idea is to take a "modular" approach to the control surfaces. in this spirit, i have designed 5 different 6"x9" plexi panels that combined in various quantities will still equal out to a large control surface, and i can choose any combination of them that i want.
additionally, with the smaller size, we can shrink the thickness of each panel because there will need to be a brace/support around the edges of each one. so, drop the thickness down to 1/8", and now we don't need countersinks.
the tradeoff of course is that if i want a large control area, i will have to build a very complicated latticework or matrix of wood or other type braces under the panels to support them. this also means that the interesting beauty of an all clear plexiglass enclosure is out of the question - it was exorbitantly expensive anyway (for what reason i could not determine frankly, but don't know enough to question the plastic fabrication folks).
a couple additional caveats: the buttons and controls need to be compressed inward a bit on each 6x9 panel, because we are assuming an inch around every edge on the underside to connect to the wood braces. that means that the extension of the pots, buttons, etc, cannot overlap with it on the underside. i will also lose another 2 channels to the space needed... and the number of UMC's needed for this one drops to 5 rather than 6. finally, if i want to do different colors (as below), i have to purchase a full 2'x4' panel for each color, so i might as well cut up panels enough to do two full boards.
After lining up different possibilities of the 6x9 panels, i come to a fairly interesting variation that is asymmetrical and also want to do a couple different colors.
thus, i give you Colossus version 3:

and sugegsted panel coloring:

of course this renders the likelihood of doing ethcing designs nearly impossible (sorry james), and also means there are new challenges with the rest of the box and frame to house the device.
Wednesday, February 11, 2009
UTTERLY RIDICULOUS!
the quote came back today for the entire plastic enclosure.... it was absolutely and totally ridiculous. i knew it would not be cheap, and was preparing a budget to handle it, but let's just say i could start building on that modular collection below for the price it came back as. its not even much of an option to go with just the front panel and do the wood enclosure myself. the etching is actually not the issue - its primarily the ability to counter-sink the holes.
so after all this goddamn wait and assurances that they could countersink pretty easily, the answer is no. GRRRRRR.
their only suggestion was to find a woodwork place that had a "CNC" router, and i have already tracked down one of those places. i am sending them some basic info on the panel only ASAP. the other option was to countersink holes on the panel just large enough to get the nut onto and then screw it tight. the knobs would continue to mount above the plexi panel, not sink down into it at all. that way the countersinks would not have to be so exact as to ensure that the turning of the knob was not off centered.
they are looking into this, but suffice to say this is no longer an all clear enclosure, and i am not so sure about the etching anymore either.
Tuesday, February 10, 2009
The Wish List
So since I am wasting time, i might as well outline my mega wish list.
there is a more thorough one on gear junkies, but my primary goals for god only knows how long is to procure a solid modular synth, or better yet, a synth collection.
the top among those is this from synthesizers.com:

and this one from analogue systems:

And after that, i am a huge fan of the current crop of "semi-modulars", such as the the analogue solutions red square:

The Vermona PerFourmer:

The Cwejman MK2:

the Metasonix Wretch Machine:

and the Future Retro XS:

The price tag for all of the above - a cool $30k or so. there has got to be some scheme or way to raise money for this other than a second job at McDonalds, theft, or mass credit debt. anyone have any ideas? the unfortunate thing is that these also rarely come up on ebay as used units....
there is a more thorough one on gear junkies, but my primary goals for god only knows how long is to procure a solid modular synth, or better yet, a synth collection.
the top among those is this from synthesizers.com:
and this one from analogue systems:
And after that, i am a huge fan of the current crop of "semi-modulars", such as the the analogue solutions red square:
The Vermona PerFourmer:
The Cwejman MK2:
the Metasonix Wretch Machine:
and the Future Retro XS:
The price tag for all of the above - a cool $30k or so. there has got to be some scheme or way to raise money for this other than a second job at McDonalds, theft, or mass credit debt. anyone have any ideas? the unfortunate thing is that these also rarely come up on ebay as used units....
Now Two Delayed Projects
so, still waiting on the MIDI enclsoure quote and completion.
and now, i picked up a x0xb0x kit from ebay for pretty cheap. all parts already selected and divided out, labeled, etc. i just have to spend the time building it. I'll let you know when it arrives, and from the instructions on adafruit.com it looks infinitely more complicated than the MIDI box. nonetheless, i am going to attack it ASAP, unless they both arrive and are ready for me to work simultaneously. then its hello Colossus and i'll get to the acid bass next. you can never get enough acid basslines....
and now, i picked up a x0xb0x kit from ebay for pretty cheap. all parts already selected and divided out, labeled, etc. i just have to spend the time building it. I'll let you know when it arrives, and from the instructions on adafruit.com it looks infinitely more complicated than the MIDI box. nonetheless, i am going to attack it ASAP, unless they both arrive and are ready for me to work simultaneously. then its hello Colossus and i'll get to the acid bass next. you can never get enough acid basslines....
Friday, February 6, 2009
Aaaand Still Waiting....
Getting kind of soured on the local place i took the enclosure to for building.... they still have not gotten back to me with even a quote. So, we continue in the holding pattern. all other gear ready to begin, and i even took the next week off back when i assumed the shit would be done now.
Can you tell i'm annoyed yet?
Can you tell i'm annoyed yet?
Thursday, January 29, 2009
Waiting Game
I took the final designs down to Plasticare on Monday, and have been waiting for a quote before they formally get started. Caled yesterday and Randy is out sick, so the project is on hold. Hopefully it can catch back up because i just took a week of vacay mid-february to find time to finish building the device.
Also, i started practicing soldering, and i sucked at it. went and got some alligator clips to help hold things down and hopefully make it easier, and also switched to rosin core solder. both these steps help immensely, but i still have some practicing to do before this becomes easier.
Also, i started practicing soldering, and i sucked at it. went and got some alligator clips to help hold things down and hopefully make it easier, and also switched to rosin core solder. both these steps help immensely, but i still have some practicing to do before this becomes easier.
Friday, January 23, 2009
The Time is Nigh
The final potentiometers arrived today, and i spoke briefly with the plasticare inc guy Randy to get some final questions out of the way. making sure they could use the .FLA file format, trying to figure out what to do with the pot notches, etc.
for the pots, there is a very small notch on each side that is designed to wedge into the panel and keep it from turning. Randy believes he can make this with the laser cutter, and if not, can do very small cuts manually.
Another issue was the countersinks. smaller ones no sweat, but the larger ones to fit the 2 and 4-inch knobs were problematic. turns out they have a 2 inch countersink for the large volume knobs, but there is no 4-inch countersink. not surprising. this will be fine - i have a single pot that has an extra long shaft for the mega knob. should be case closed.
Once i get the design to them, the lead time is about two weeks now. So, i will try and get it to them first thign next week.
Slightly related note, i began designing a DJ-style mixer for my good friend James who provided the etch graphics below. pic below - its in a triangular shape. sort of interesting, and with all the spare parts i am likely to have, i bet i could build it after Colossus for not much more than the cost of a couple plexiglass panels:

Thursday, January 22, 2009
Etching on the Panels
Okay, so this thing is extremely close to construction time. I've had my buddy James working on a graphic to etch into the plexiglass panels, and this is what he came up with, with the panel buttons view super-imposed over top of it.

Planning to put the final touches on sizing (already got the mount holes in the floor panel for the UMC's set exactly) and get it to the plastics company ASAP, maybe as early as tomorrow.

Planning to put the final touches on sizing (already got the mount holes in the floor panel for the UMC's set exactly) and get it to the plastics company ASAP, maybe as early as tomorrow.
Tuesday, January 20, 2009
UMC Madness
The UMC circuit boards arrived today (as well as additional buttons and LED's for the illuminated pushbuttons):

This evening i endeavored to connect a couple controllers to a single UMC device and i am tickled pink to report that it worked after some fidgeting and what not.
I ran a single pot and a single button to the first two control points on the first header, with DIP1 set to off, all others on (except 10 which is an additional function thing). Plugging it in, the WIN XP machine identified the device quickly and easily, and then Ableton v5 saw the device and it seemed to be receiving data from in (MIDI IN flashed). the red LED on the UMC also flashed when pressing the button or turning the pot.
But it would not "learn" the data at first. i tried a couple different ideas, unplugged the button LED (which didn't work to begin with) and had no success. i then took it back upstairs and plugged in the UC33, which worked fine, and then restarted with the UMC back in the same place where the UC33 had just worked.... and it worked great. i assigned the button to a mute, and the pot to a send channel. BOOM.

Ken would probably trip that i plugged this in like the pic above, no solder or mounting, just running some cables. but i had to know that i could do it. ;)
Sunday, January 18, 2009
Misc Updates
Got some advice on how to test the slide pots and others to determine what pin is what, so i have solved that issue. Thanks once again to Ken of Hale Micro
Speaking of Hale Micro, Ken sent the devices Friday, so they should arrive MON or TUE. he programmed each with unique device names and MIDI channels so that hopefully they boot up seperately each time and i can use MIDI learn and they will never cross paths.
finally, ordered all the other pots i need, they are enroute. and have decided to replace the pan knobs, although i really liked their look. this is the new knob that will be used:

the pots these will attach to have a center detent so that will work well for pan knobs.
All Plexiglass All The Time
A visit to Plasticare Inc in Englewood with a guy named Randy helped me clarify lots of things, and i am on the path to starting construction very soon.
The biggest pain has been finding the right pots to go through 1/4" of plexi - there has been a distinct lack of cheap pots with 3/8" bushings.
however, this problem is definitively solved by countersinking. i was not sure it could be done, but randy showed some clear examples with their tools (i CANNOT do this with what we have). in the pic below you see the countersink. this will allow the pot bushings to come up through the plexi just fine:

Next, i discovered quickly when i had the large pieces in front of me and in hand that even 1/4" is too thin when spread across several feet. it will bend. and the machines they have on site to etch and cut can only handle max sizes of 18x32". this means i would have to have multiple panels horizontally in the old design.
So, i have switched to 3/8" thick, and gone with single vertical panels, all at 60degrees incline - rather than multiple horizontals at varying degrees. this also required some retool of where knobs and buttons would go. that new design is below:

Still hoping to put an etched design in the top-middle section where you can see the blank space.
Also considering an even bigger step - the entire enclosure in plexiglass, clear specifically, rather than just the face panels. Randy helped with some ideas for bracing the underside with plexi, and then it was a logical next step to say why not do the walls in plexi as well?
Finally, the giant master volume knob WILL be done in plexi after my convo with Randy - this will be an easy step apparently, and i have already given a basic design (will post JPEG from visio later).
Saturday, January 17, 2009
Most Materials Arrive
I have lots of updates that i hadn't posted through the last week, but let's start with the buttons. All of them have arrived, and here is a smattering of them:

Here is a closeup of the switch assembly on them:

I also ordered several samples of pots to try and get ahold of this outlier in my materials needs:

So a few notes here.
First, the knurled shaft pot in the pic above (the one with teeth and a cut down the shaft) is EXACTLY what i need for the smaller knobs with black on top. they fit nicely, and they constitute the majority of the pots needed. therefore, i have gone ahead and ordered all of them from Mouser. the outstanding issue was the length of the bushing, and that has been resolved (a seperate update on that later today).
The other pot in the pic above was with a "D" shaft for the aluminum "hat" looking knobs you see below - they do not fit at all, and i have to go with another knob type. I broke a pot trying to force it on, even though the measurements suggest it should work. the easiest way to get aroudn this is to pick standard round 1/4" shafts and then knobs with set screws to get them on just right. i will post later on my selections to replace them. disappointed, as i liked that design, but whatever. we are so close to construction that i just want to move on.
Second, the LED's were not included with the illuminated pushbuttons. this is annoying and lame, but whatever - i have ordered them to arrive in a week or so.
Finally, the joystick is cool looking and i'm going to use it, but it is switch based only, meaning it has an on/off trigger in each of the four primary directions - it is NOT a potentiometer in each direction as i expected and hoped. turns out those are more rare than i thought anyway. here is a closeup of the joystick:

More later on remaining parts, and especially the plexiglass panel and enclosure. Colossus version 2 is at hand....
Tuesday, January 13, 2009
The Waiting Game
I've got at least 5 different packages en route to me right now, including a couple samples of different potentiometers to try and get this sorted out. its all so much i am really kinda lost.... there seems to be a couple possible solutions as mentioned below, but i need to get them in hand and also go see the plasticare samples to be sure, before i commit to so many more.
On a high note, i found a really great local shop that sells tons of electornics components, that no one else had suggested to date - called JB Saunders in Boulder. it was exactly what i needed and they even had some of the gear i have been seeking and bought online. definitely need to get up there if i decide on what pots to use finally.
Gave up completely on the CTS parts below - no sellers were helpful (i should note that both Arrow and Avnet Electronics, both local Denver distros never even bothered to call back with estimates/quotes), and after going direct to the manufacturer they seemed to give the run around as well, so screw them. another brand will get my business.
Sunday, January 11, 2009
Complexity Abounds
Latest version of the Panel layout is here:

You will see i have cut the two rows of illuminated buttons for some smaller, standard contact buttons - the other ones became too expensive with LED replacements for each. these ones will be fine, though. added the fader back in on the top panel, and a few more contact buttons in the master section.
Also, i've been conversing with my buddy Soaringbrain about a graphic that could be etched into the panels. originally i thought we could only fit something small in the top right corner, and that may still be the case depending on how the cutting tools work - but then we thought maybe it would be cool to etch something across the entire thing in the background behind all the knobs. James is presently working on some ideas for that. I will contact the plasticare inc guy this next week to talk about how this could be done and if its possible/affordable. will post some drafts of that graphic when comfie with it.
Subscribe to:
Posts (Atom)